May 11, 2026
Cheesy Pizza Beans (Vegan)
Made with pantry staples and ready in under 30 minutes, these Pizza Beans are a comforting, nutrient-packed, one-pan dish that feels totally indulgent! It’s everything you love about pizza but packed with protein and fiber thanks to the beans!
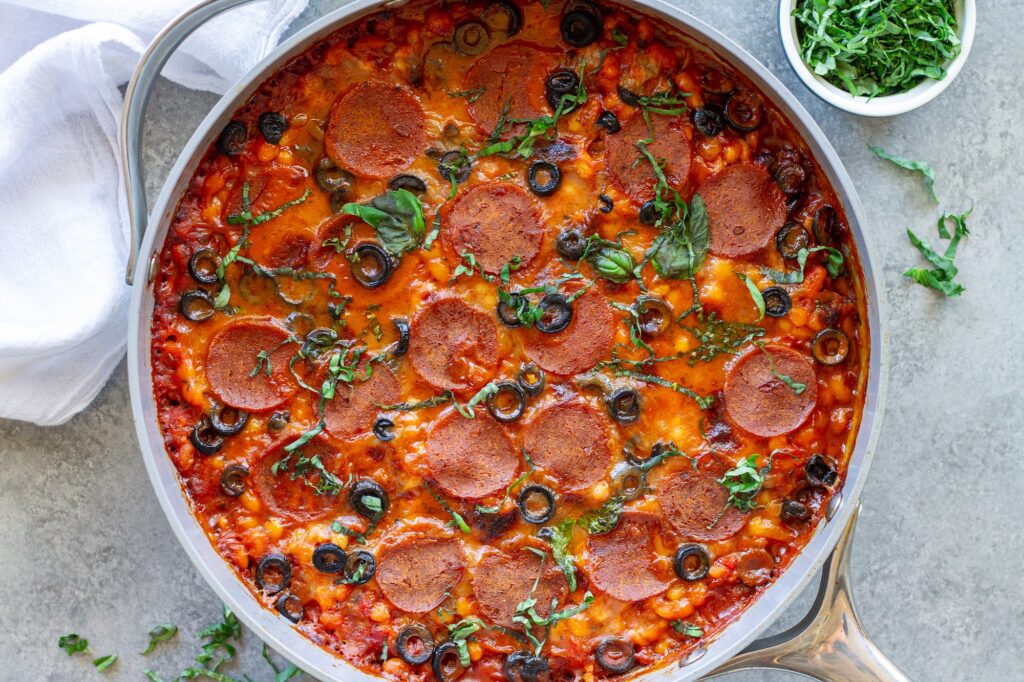
Table of Contents
why you’ll love this recipe jump to recipe video step-by-step instructions tips and faqsCheesy Pizza Beans
If you’ve ever found yourself staring in the pantry and wondering what to make with those cans of beans gathering dust, this recipe is your answer. Here at our house, we have a running goal to eat a cup of beans every single day. To keep that goal manageable without spending hours in the kitchen, I make it a ritual to prep a big batch of beans at the beginning of every week.
Recently, I couldn’t scroll through my feed without seeing “Pizza Beans” popping up everywhere. As a self-proclaimed pizza lover (we actually have a pizza oven in our backyard and make fresh pies multiple times a week), I knew I had to give this trend a try! I wanted to see if I could capture those same flavors of our backyard pizzas but pack ‘em into a quick, one-pan meal that fit right into my weekly bean prep.
Inspired by The Smitten Kitchen’s original recipe, these vegan pizza beans give all the savory flavors of pizza night, but with the added benefits of plant-based protein and fiber. It’s the kind of meal that feels like an indulgence but secretly fuels your body well. Perfect for busy weeknights or lazy weekends when you need something quick that still feels special, these pizza beans prove that comfort food doesn’t have to be complicated!
Why You’ll Love This Recipe
- Helps you hit your fiber goals effortlessly! We aim to eat a cup of beans every single day, and this recipe makes that goal feel like a treat, not a chore. By using navy beans as the star, you’re instantly packing in a massive dose of plant-based protein and fiber without having to “force” a side of legumes onto your plate.
- The ultimate weekly meal-prep hero: If you’re like me and try to prep a big batch of beans at the start of the week to stay on track, this is the perfect way to use them. It transforms plain canned beans into a gourmet-style meal in minutes, saving you time on busy weeknights while keeping your “daily bean” streak alive.
- One Pan, Zero Stress Cleanup: From sautéing the aromatics to baking the cheesy topping, everything happens in one oven-safe skillet. That means minimal dishes to wash and more time relaxing after a long day!
- Customizable: load it up with your favorite pizza toppings to make it uniquely yours.
- Budget-Friendly and pantry-powered: Most of the ingredients are staples you likely already have: canned beans, jarred marinara, and dried herbs. It’s an incredibly affordable way to feed a family without sacrificing flavor or nutrition.
- Kid approved and adult loved: The familiar flavors of pizza make this a guaranteed hit with kids, while the depth of flavor from the garlic, chili paste, and fresh basil keeps the adults satisfied. It’s the rare recipe that bridges the gap between “healthy” and “indulgent” perfectly.
Step-by-Step Instructions
1. Preheat Your Oven:
Preheat the oven to 425°F (220°C).
2. Sauté the Aromatics and Build the Base:
Heat the olive oil in a large oven-safe sauté pan over medium-high heat. Once hot, add the diced onion and sauté until slightly translucent, 1 to 2 minutes. Add the minced garlic and cook for another 30 seconds to 1 minute until fragrant. Pour in the marinara sauce, Calabrian chili paste, Italian seasoning, dried oregano, sugar, salt, and pepper. Mix thoroughly to combine all the flavors.
3. Add the Beans and Cheese:
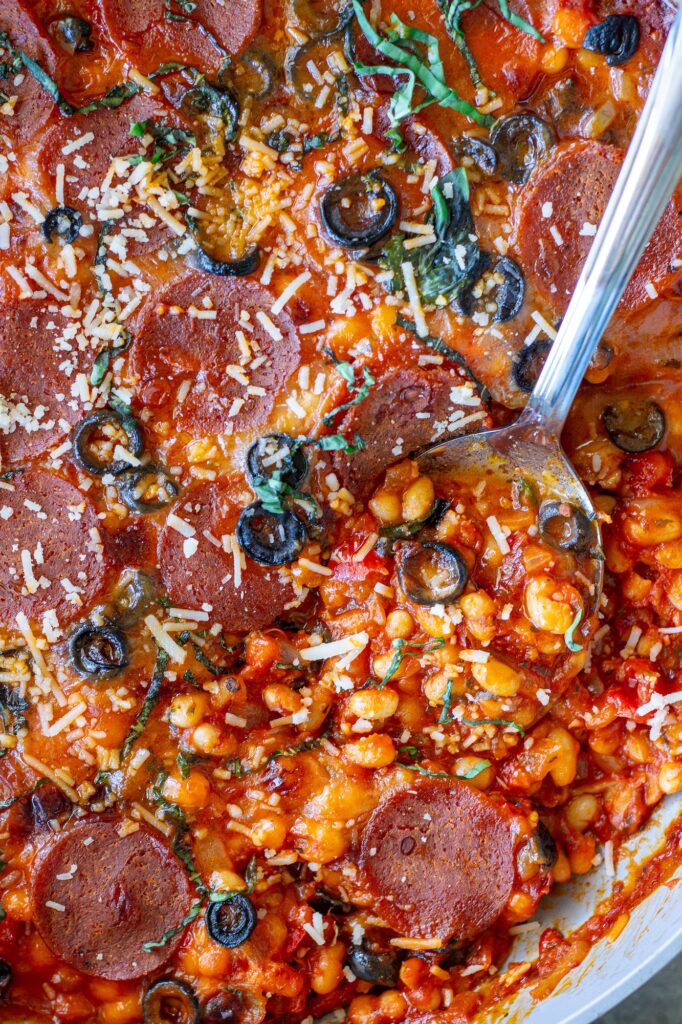
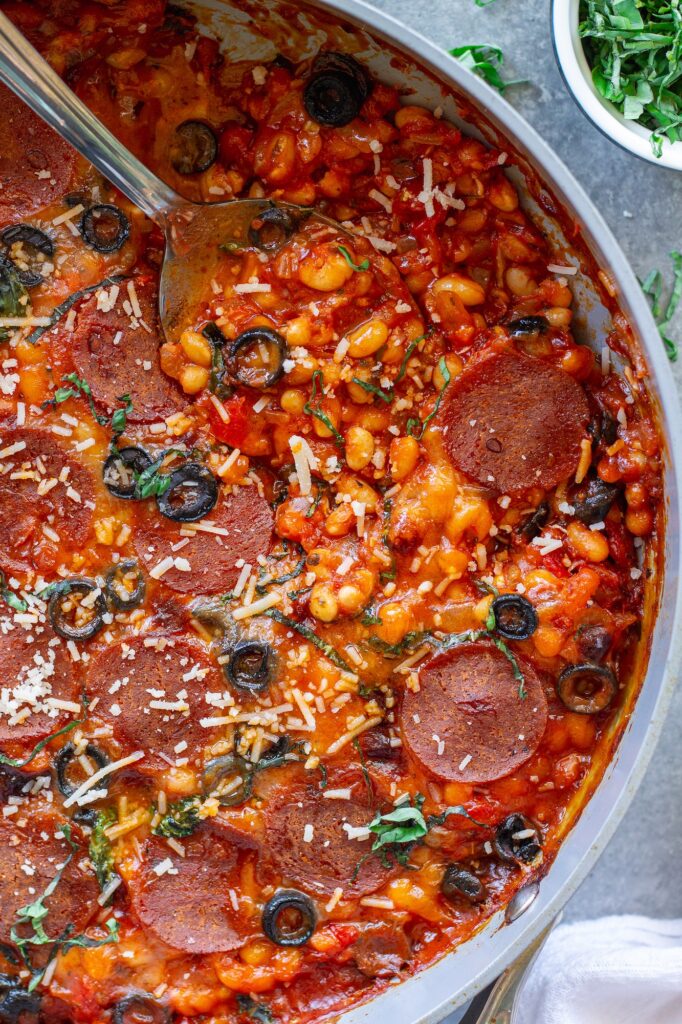
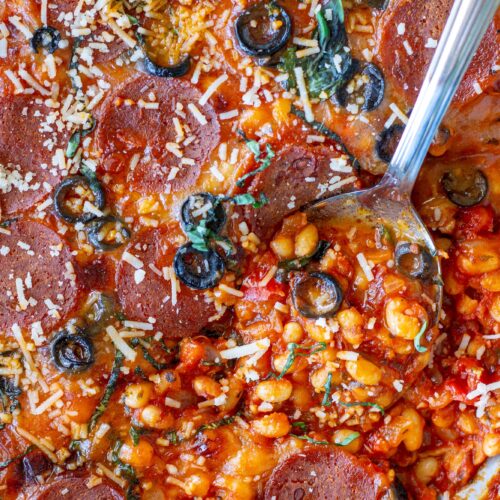
Stir in the drained and rinsed navy beans, ensuring they’re evenly coated in the sauce mixture. Sprinkle the vegan mozzarella evenly over the top of the beans. Add your chosen toppings (pepperoni, olives, etc.). Cover the pan with a lid or tightly with aluminum foil.
4. Bake:
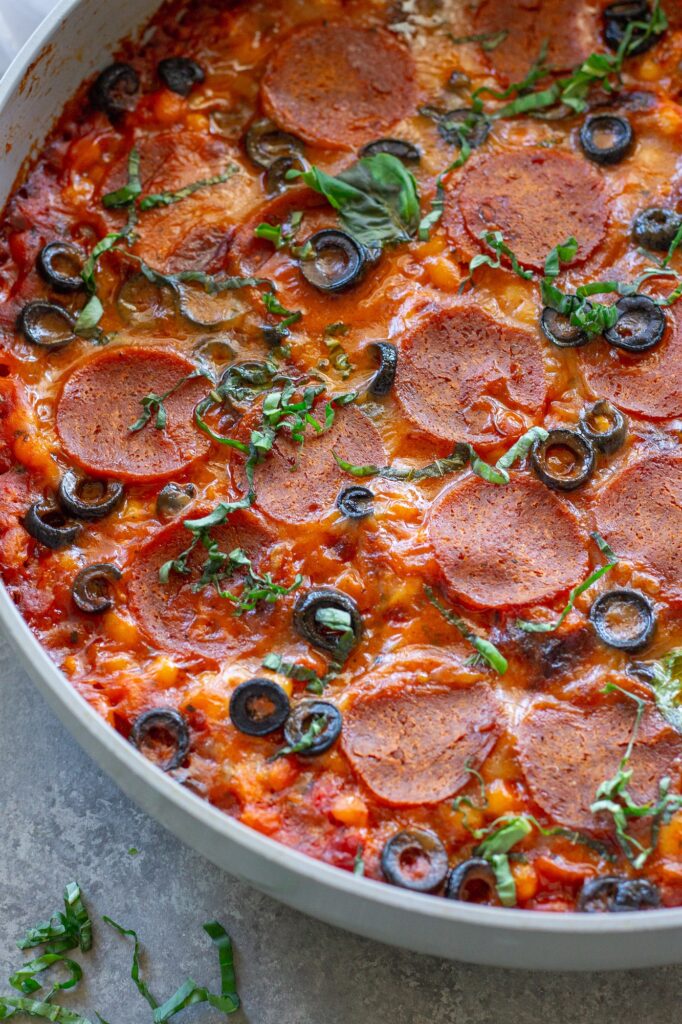
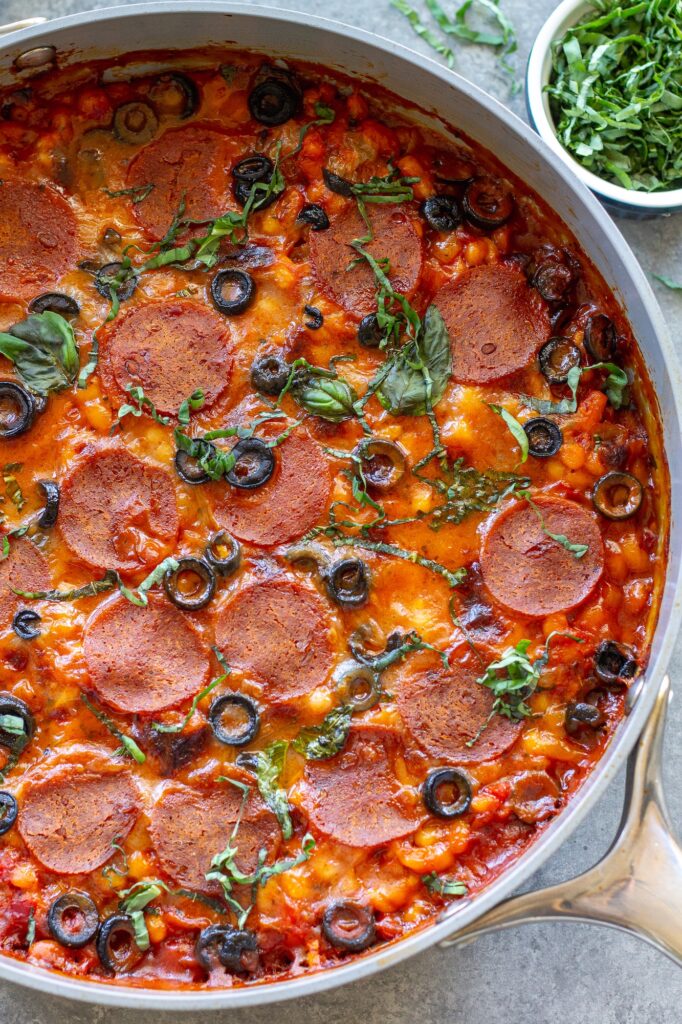
Bake for 10 to 15 minutes until the cheese has melted and the dish is heated through. Remove the cover and place the pan under the broiler on low setting. Broil for 3 to 5 minutes, watching closely, until the cheese is golden and bubbly.
5. Garnish, Serve and Enjoy!
Remove from oven, garnish with grated vegan parmesan and fresh basil if desired. Serve hot and enjoy!
Tips and FAQs
- No oven-safe skillet? No problem! If you don’t have an oven-safe skillet, you have two easy options:
- The Transfer Method: Sauté your onions, garlic, and beans in your regular skillet on the stovetop. Then, carefully transfer the entire mixture into a baking dish (like a 9×13 casserole or a pie dish). Top with cheese and toppings, then bake as directed.
- The Stovetop Melt: Skip the oven entirely! After adding the cheese and toppings, simply cover your regular skillet with a tight-fitting lid. Turn the heat down to low and let it steam for 10 to 15 minutes. The trapped heat will melt the vegan cheese perfectly without burning the bottom.
- Watch the Broiler! Vegan mozzarella melts beautifully but can go from “golden” to “burnt” in seconds under a broiler. Once you move the pan under the broiler, keep an eye on it. Set a timer for 3 minutes, but keep your eyes on the cheese. You want it bubbly and slightly browned, not blackened!
- Sauce consistency matters: If your marinara sauce is very thick, the beans might absorb too much liquid and become dry during baking. If the mixture looks too thick before you put it in the oven, stir in a splash of vegetable broth or water to loosen it up. It should look saucy, not pasty.
- Make-ahead: Since we prep beans weekly, this is perfect for batch cooking. You can assemble the dish (up to step 6) and store it in the fridge for up to 2 days. When you’re ready to eat, just pop it in the oven. You might need to add 2 to 3 extra minutes to the baking time if the dish is cold from the fridge.
Can I use a different type of beans?
Absolutely! Cannellini, chickpeas, or kidney beans all work well. Navy beans have a creamy texture that holds up nicely.
Is this recipe gluten-free?
Yes! Just ensure your marinara sauce and vegan cheese are certified gluten-free.
Can I make this ahead of time?
Yes, prepare through step 5 and refrigerate for up to 2 days. Bake when ready to serve, adding a few extra minutes if cooking from cold.
Can I freeze pizza beans?
Yes, freeze in portions for up to 3 months. Thaw overnight in the fridge before reheating.
Ready to Try This Cozy Dish?
I hope you love Pizza Beans as much as I do! If you give this recipe a try, I’d love to see! Snap a photo, take a video, or make a story and post it to Instagram or Facebook, and tag me at @eat_figs_not_pigs and #EatFigsNotPigs. I love seeing your recreations of my recipes! xx!
Cheesy Pizza Beans (Vegan)
Equipment
- 1 Oven-safe skillet
Ingredients
- 2 tablespoons olive oil
- 1 small yellow onion, diced
- 8 cloves fresh minced garlic
- 1 (24-ounce) jar of marinara sauce, homemade or storebought
- 2-3 tablespoons Calabrian chili paste
- 1 teaspoon Italian seasoning
- 1 teaspoon dried oregano
- 1 teaspoon sugar
- ½ teaspoon salt, plus more to taste
- ½ teaspoon pepper, plus more to taste
- 2 (15.5-ounce) cans of navy beans, drained and rinsed
- 7 ounces vegan mozzarella
- Toppings of choice (I used vegan-friendly pepperoni and black olives)
- Grated vegan parmesan for garnish, optional
- Fresh basil for garnish, optional
Instructions
- Preheat the oven to 425°F.
- Heat the olive oil in a large oven-safe sauté pan over medium-high heat.
- Once the oil is hot, add the onion and sauté until slightly translucent, 1 to 2 minutes. Add the garlic and sauté for another 30 seconds to 1 minute, or until fragrant.
- Pour in the Marinara, Calabrian chili paste, Italian seasoning, dried oregano, sugar, ½ teaspoon salt, and ½ teaspoon pepper, mixing to combine.
- Add the navy beans, mixing to coat.
- Sprinkle the mozzarella over the top of the beans in an even layer, followed by your toppings of choice.
- Cover the pan with a lid or tightly with foil and bake until the cheese has melted, 10 to 15 minutes.
- Remove the lid and place the pan under the broiler on the low setting, until the cheese is golden and bubbly, 3 to 5 minutes. Make sure to watch it closely so it doesn’t burn.
- Garnish with Parmesan and basil, and enjoy!